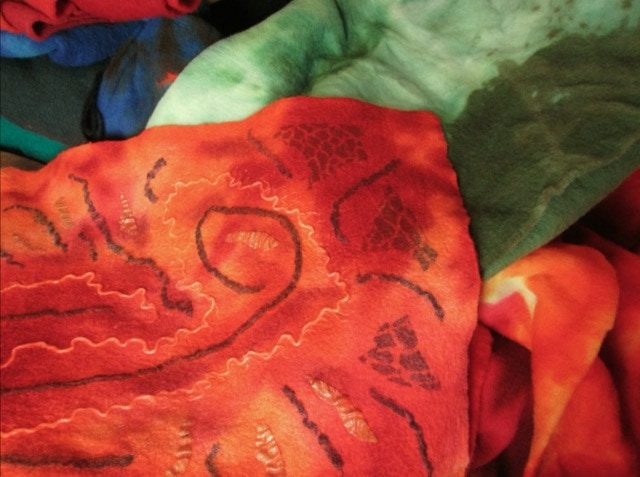
Nuno-felting is a technique where you by attaching different materials to your woollen base can create very appealing textures – beautifully painted or laminated felt fabrics.
The easiest and funniest way to make Nuno is to make it on hand dyed Ohukainen because the result is always a surprise. Ohukainen is 100% merino wool needle felt, it felts easily and is ethically produced. Ohukainen works well in accessories – it is not too stiff, and the surface is not too “hairy”.
In many cases it’s simply smart to utilize Nuno-technique when producing felt fabrics for clothing, since you can prevent stretching and pilling. For the parts in your clothing that need to endure more friction (under arm etc.) use only silk chiffon on top of hand dyed Ohukainen and it will do the trick while looking wonderful.
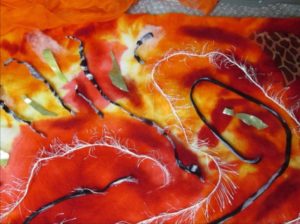
Commonly used Nuno-materials are silk chiffon, ponge-silk and cotton gauze. These materials will work like a glue – they will felt to Ohukainen like a dream and this will allow you to add different materials between them for example yarn, other fabric pieces etc. to create interesting 3D-design to your felt.
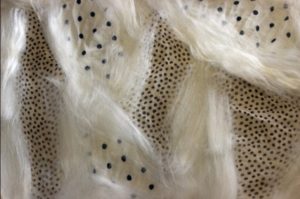
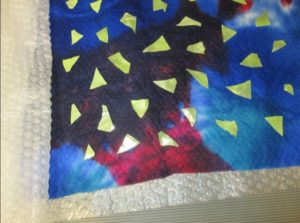
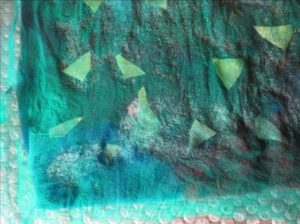
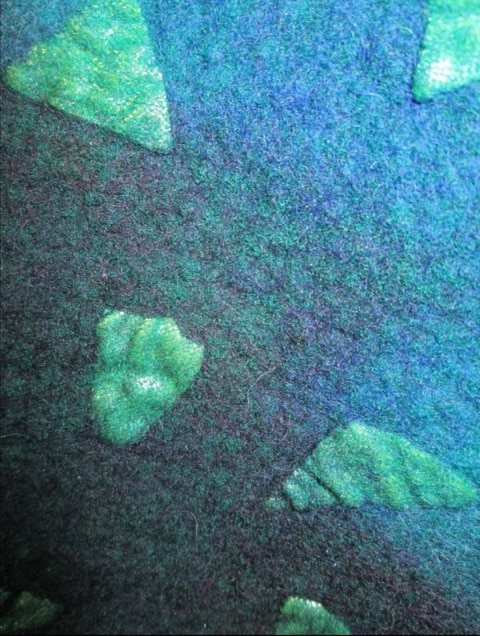
Start with a simple Nuno; Ohukainen + silk chiffon. If the Ohukainen you’re using is hand dyed, the finished fabric will be lively even if you’re using one coloured silk chiffon on top of it. Ponge-silk on the other hand will create nice wrinkled surface on the felt but hides the Ohukainen underneath. Cotton gauze will give your design more “rustic” look. Synthetic fabrics rarely attach well on wool, but by cutting triangle pieces of synthetic fabrics and placing them under silk chiffon on top of Ohukainen, you’ll get interesting 3D “bubble fabric”. Remember to leave 1-2cm space between the triangles so that silk chiffon has room to attach on wool.
Nuno-felting is so rewarding yet challenging and fun that you’ll lose yourself in it! Most important thing is to be diligent, enjoy the process and be crazy creative with this technique! Samples, tests and mistakes will teach you the most.
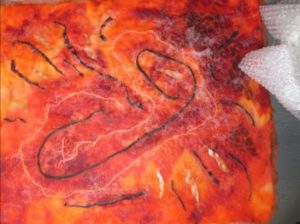
Every felt maker will develop their own way of making Nuno – there is no right or wrong way to do it! I usually blend everything possible on my Nunos. I start building Nuno from chiffons and cotton fabrics on top of hand dyed Ohukainen and “bind” everything together with hand dyed silk merino tops. These are instructions of my way of making Nuno.
Elina’s way of making Nuno:
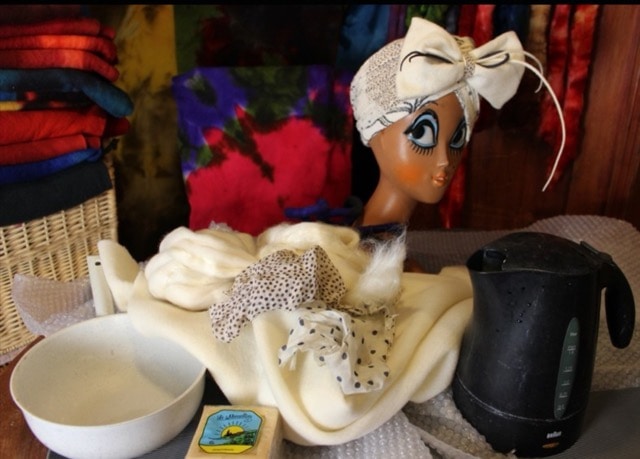
For Nuno you need hand dyed or off-white Ohukainen* (100% merino wool, 150g/m2) and the following tools for felt making:
- Good scissors
- Silk chiffon and/or other Nuno materials you wish to use
- Marseille-soap
- Bubble plastic (Nuno loves bubble plastic)
- Piece of bed sheet for rolling
- Felting mat
- Kettle and a bowl for hot water
*available only at Felt Faction
How to make Nuno felt?
- Place felting mat on your workstation.
- Cut your piece for Nuno-felting from Ohukainen.
Keep in mind that Ohukainen will shrink 30% in felting.
- Cut 2 pieces of bubble plastic, both pieces larger than the piece of Ohukainen you have.
Place one bubble plastic on the felting mat, bubbles facing up.
- Sart Nuno-felting
First place Ohukainen on top of the bubble plastic, add for example small triangles from synthetic fabric and place silk chiffon, that is about 6cm bigger than your design on top of everything. Chiffon will shrink when adding water and that’s why it needs to be bigger. Remember to leave space between the triangles and keep them far enough from edges (leave 1-2cm space between them) and remember that the chiffon will need space to attach too to the edges.
- Sprinkle hot soapy water on top of your Nuno.
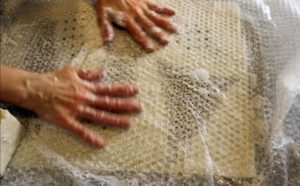
Spray bottle is a good tool for this too; put pieces of Marseille-soap in it with hot water and spray it on your Nuno. Don’t touch your design by hands at this point when adding water. Place the other bubble plastic over Nuno, bubbles towards your work. Add small amount of soapy water on top of the bubble plastic and start felting gently through the plastics, hands moving inward so you won’t “drop” anything in your Nuno from their right places.
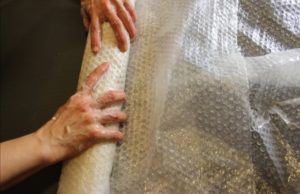
- Make a roll of your Nuno with the bubble plastics on.
Place the roll inside the piece of bed sheet and make a tight roll of that. Keep rolling against the felting mat couple minutes, open the roll and roll from different direction. Add hot water to the Nuno between the rolling and adjust bubble plastic better. If you are making a big Nuno piece you need to roll more in every direction. After the rolling, chiffon should be well “glued”/felted in Ohukainen. The surface of the Nuno doesn’t look 3-dimensional and bubbly at this point, but it looks even.
- If the chiffons have attached well, you can start throwing (if not, add more soapy hot water and roll more inside the bubble plastics).
At this point you don’t need the bubble plastics anymore. Press all the water out and start throwing your Nuno piece against the felting mat in a bundle form, turn it around as you throw it so the Nuno will felt from every direction. Start the throwing gently and add force as you get along. Heat the piece if needed (dip in hot water bowl and press all the water out for throwing). Piece should be moist and warm when you’re throwing it. Bigger Nuno pieces need more time in throwing than smaller ones. Throwing might take more time depending on the size of your Nuno piece, temperature of your strength. Check your Nuno, the surface should look now “bubbly” and it should have shrinked now about 30% from the starting size.
- Finish the “curly” edges of the piece by rolling it inside the piece of sheet on the felting mat as you did in the beginning, but this time without bubble plastic.
- Rinse the ready Nuno piece first with warm water and then with cold water (long enough). Press extra water out and place it to dry.


Tips and tricks
- With hand dyed merino wool tops, you can “paint”/change colour of your piece of Ohukainen from under chiffon and on top (not under the synthetic pieces, it will not attach there).
- If you run out of silk chiffon, you can add second piece on top, but remember to place it overlapping about 5cm area to the other one and it doesn’t hurt to add few fibres of wool (eg merino tops) to secure the seam. Bear in mind though that there should not be any fabrics added on this overlapping area since they might prevent your chiffons to felt in properly.
- Cut the extra chiffon around the Nuno piece after throwing.
- You can make Nuno-felting on thicker needle felt too, for example over Jääkarhu, but the surface of Jääkarhu should be brushed with cat brush to get the fibres on top to attach better. If you are using divided Jääkarhu for Nuno, make Nuno to the softer side.
- You can use bubble plastics many times, as long as they are still in good shape and have still air. Notice that there are differences in the bubble plastics – don’t use bubble plastic that is hard that can tear your Nuno-felting design.
- You can do Nuno-felting on other type of wool or needle felts, but you get smoother surface with Ohukainen.
- Use rubber felting mat! It doesn’t leave splinters to your Nuno and won’t damage it. It is also very durable and your hands will love it.
Enjoy!